Here are a variety of resources to help you in creating your portrait painting. You may also want to look at the portrait proportions page for more details.
From Blank Canvas to Captivating Portrait: A Step-by-Step Journey
Welcome to an immersive guide where I take you through the process of transforming an old canvas into a large-scale painting. With this transformative journey, you'll witness how I turned a neglected canvas into an expressive masterpiece, brimming with life and emotion.
Setting the Stage with Acrylics and Oils
Before we dive into the process, let's address a key strategy. While I worked predominantly with oil paints, I highly recommend that you lay down the underpainting using acrylics. This not only accelerates the process but also ensures quicker drying times. This strategic approach allows for seamless blending with oil paints in subsequent stages. (Very helpful in school settings as well).
Selecting Your Source and Palette
The foundation of your painting begins with choosing a reference photo that has excellent lighting. A reference with strong lighting creates a play of shadows and highlights essential for lifelike portraits. For this demonstration, I'll be portraying my daughter.
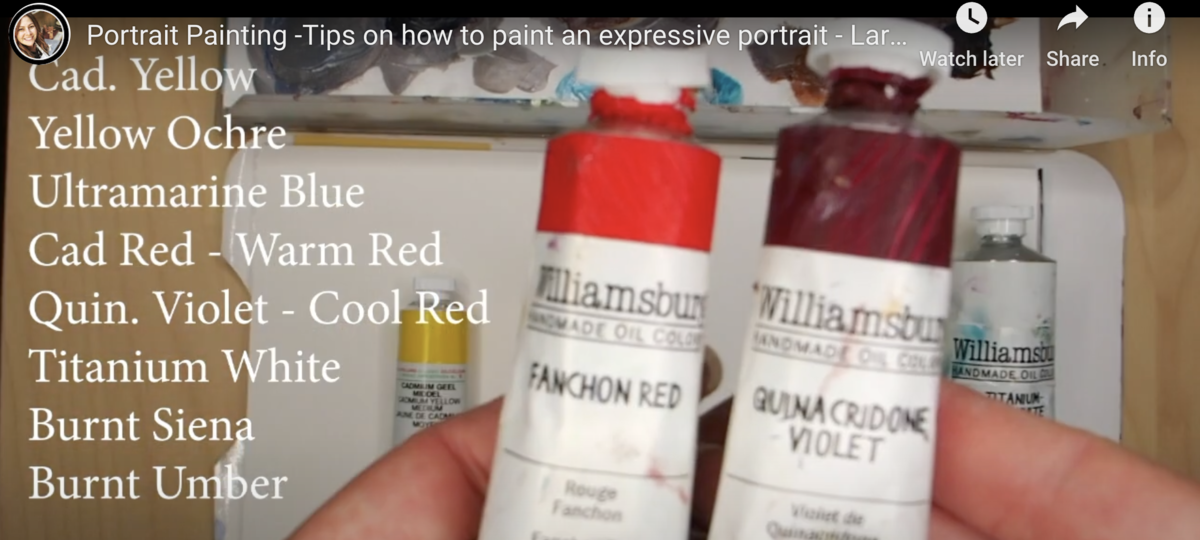
To craft an abstract background, we first select a color palette. Warm hues like Burnt Siena invoke warmth, while cooler tones like Ultramarine Blue introduce a serene ambiance. Remember, your palette choice influences the overall tone of your piece.
The Power of Abstract Backgrounds
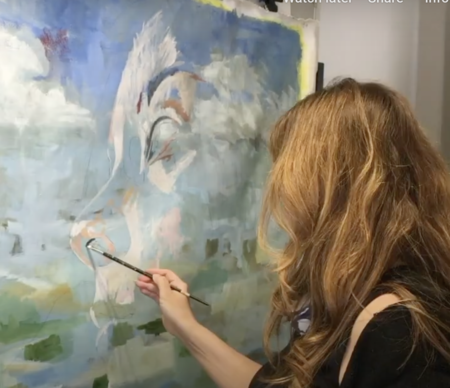
Starting with a recycled canvas, I merge warm and cool tones, emphasizing cooler shades for the upper layers. For your painting, select analogous colors for the background to create a cohesive, abstract atmosphere. Focus on color formations rather than concrete shapes, maintaining smooth strokes for the base layer.
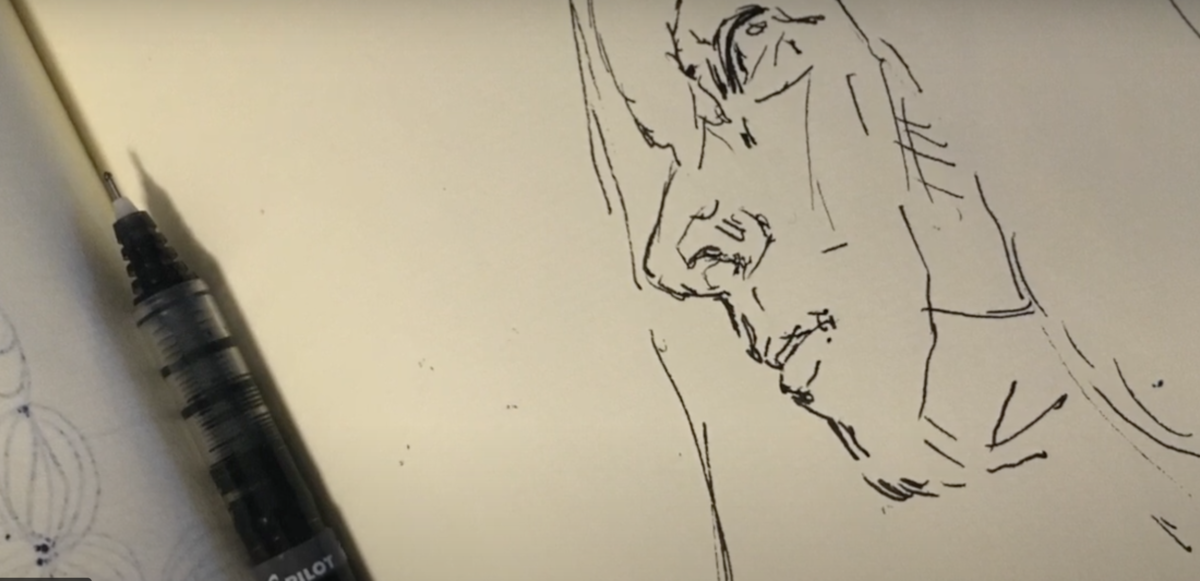
Transferring Your Vision to Canvas
Now, it's time to capture your subject on canvas.
Options:
- sketch freehand, (Video on how to draw a portrait below)
- utilize the grid method for precision,
- or project your reference photograph. While projection might sound straightforward, complexities arise due to the vast information present, often resulting in blurriness. I recommend drawing from the photograph and then projecting your sketch onto the canvas.
Embarking on the Color Journey
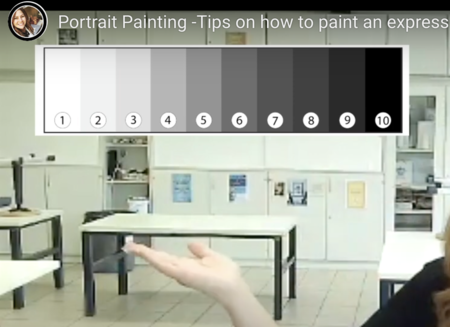
As we delve into color mixing, remember these suggestions for your portrait palette. Whether oil or acrylic, ensure a range of values, including warm and cool reds. Begin by mapping out highlights and shadows. Establish value parameters, determining the lightest and darkest points on your canvas.
Building Depth and Detail
Starting with highlights, you might be surprised by the initial darkness on your palette compared to their lighter appearance on the canvas. Focus on shaping highlight and shadow areas, gradually transitioning into mid-tones. The key is to sculpt larger shapes within smaller details, such as blocking in pupils and irises.
Embrace Transition and Refinement
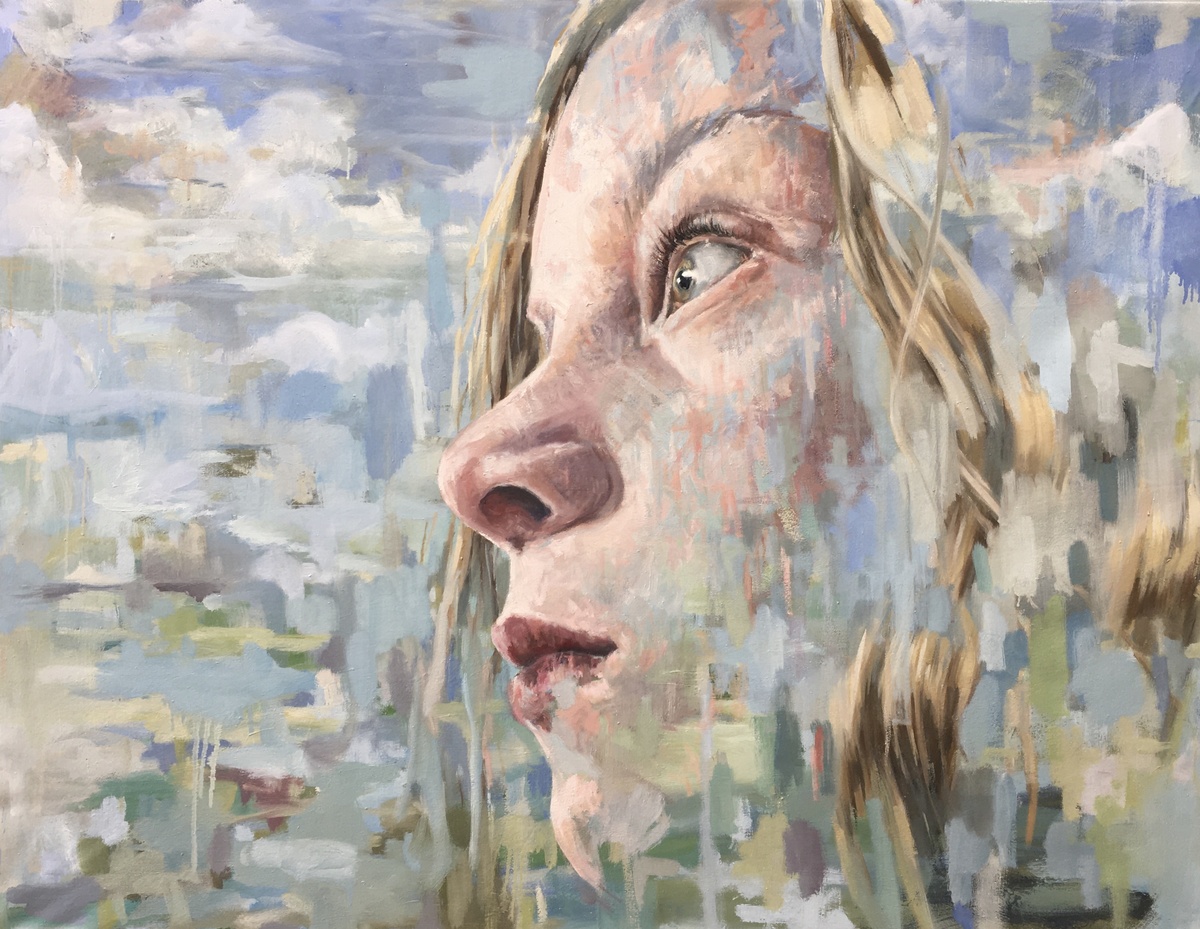
As your painting evolves, emphasize transitions between mid-tones. Utilize dry brushes to blend wet areas seamlessly. With a dry and clean brush, you merge colors without unwanted mixing. This technique connects your portrait with the background, achieving a harmonious interplay.
Desaturating for Realism
To achieve realism, desaturate colors with a touch of blue. This technique neutralizes hues, preventing a synthetic appearance. Inclusion of blue counteracts pinkish skin tones, ensuring naturalism across a variety of complexions.
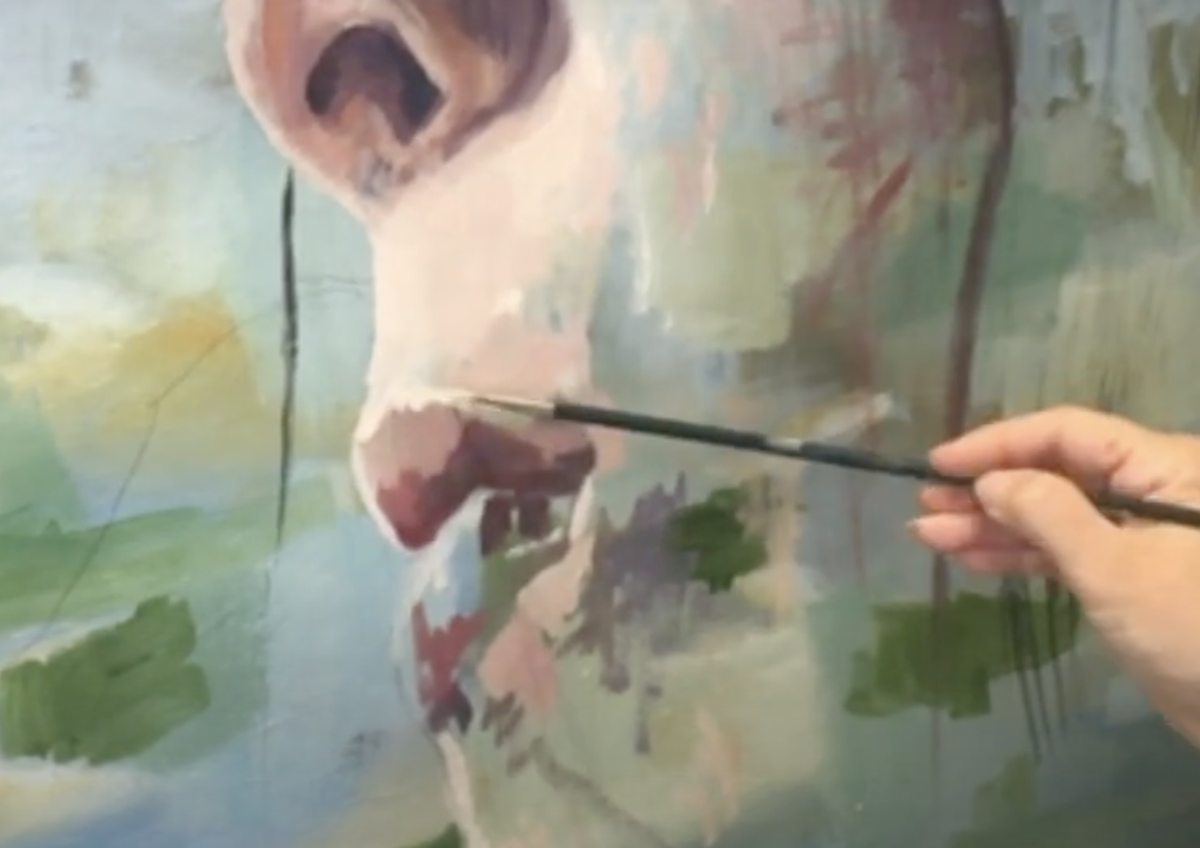
Progressing into Details
Transition from broad strokes to meticulous details. Incorporate unique colors that add character and individuality to your portrait. Maintain balance between background and portrait by using shared colors, creating an engaging push and pull.
The Artistry of Glazing
Glazing, a captivating stage, enhances your painting's allure. Utilize acrylic polymer or oil mediums to create translucent layers. This technique yields breathtaking transitions and captivating value changes. Glazing amplifies the visual impact, elevating your artwork to a new level of sophistication.
Harmonizing Portrait and Background
Merge your portrait and background through color and brushwork. The relationship between the two should be complementary, creating an emotionally resonant piece that transcends mere realism. Aim to capture the essence of your subject beyond the photograph.
A Portrait's Emotional Journey
In your journey from a blank canvas to a captivating portrait, remember that your artistry goes beyond replication. Infuse emotion and creative expression into your work. Your brushstrokes, colors, and approach create an emotional connection that supersedes a photograph's limitations.
With newfound knowledge and inspiration, embrace the challenge of transforming your canvas into a profound portrayal. Revel in the joy of creating, as your artwork transitions from a mere depiction to an emotional experience that resonates with viewers.
Ready to Begin? Your Canvas Awaits!
Armed with this guide, you're equipped to embark on a journey of artistic discovery. Gather your brushes, paints, and enthusiasm, and take your first step toward crafting a transformative masterpiece. Remember, this journey isn't just about replicating a portrait—it's about capturing the essence of your subject and infusing your unique creativity into every stroke. Happy painting!
Learn How to Paint Realistic Skin Tones: A Comprehensive Guide
Welcome to our step-by-step guide on mastering the art of painting skin tones with ease and accuracy. I'm Jessica Russo Scherr, and I'm excited to share with you a comprehensive technique that allows you to achieve a wide variety of lifelike skin tones. Whether you're working with acrylic or oil paint, this method will serve as your foundation for creating realistic skin tones that capture the essence of your subjects.
Creating a Versatile Color Palette
Before we delve into the technique, let's explore the essential colors that will form the core of our palette. Remember, there's no need to purchase pre-mixed "flesh-colored" paints as skin tones are nuanced and varied. Instead, we'll use primary colors: red, yellow, and blue. These will be the building blocks of our mixture.
Choosing the Right Reds and Yellows
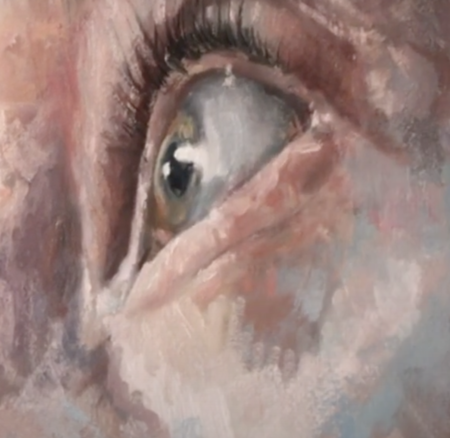
To create a broad spectrum of skin tones, we'll need both cool and warm variations of red and yellow. Cool reds like Alizarin Crimson and warm reds like Cadmium Red will become integral to achieving highlights and shadows. The choice between yellows such as Yellow Ochre and Cadmium Yellow will depend on the underlying tones in the skin.
The Role of Blue and the Power of White
Although blue may not be dominant in our mixture, it serves a crucial purpose. By adding a touch of blue to neutralize the colors, we counterbalance the orange undertones inherent in skin tones. Titanium White, our go-to color, will play a pivotal role in highlighting and shading.
Crafting a Range of Skin Tones
As we embark on this journey, remember that light and dark values are the bedrock of a lifelike depiction. Start by identifying the darkest and lightest values in your subject's skin. Begin by blocking in the darkest areas using a mix of Burnt Umber and Ultramarine Blue, saving Titanium White for highlights.
Embracing Value over Color
To achieve accurate skin tones, prioritize value over color itself. Think in terms of the shade's darkness or lightness, considering the range between 0 (black) and 10 (pure white). Gradually build up the values, blending and layering, to emulate the unique variations present in skin.
Accounting for Underpainting Effects
Keep in mind that your colors can appear different depending on the underpainting. For instance, the same color may look distinct on blue and yellow ochre backgrounds. This factor will influence your choice of colors as you build up your mixture.
The Mixing Process
Begin with a base of red and yellow, adapting to the skin tone using warm and cool variations. Gradually add Titanium White to create a value scale. Introduce a hint of blue to neutralize and refine the colors. This approach empowers you to achieve a wide range of values without resorting to black paint.
Exploring Diverse Skin Tones
Refer to our comprehensive color chart, which showcases how different combinations of reds, yellows, and blues can yield an array of skin tones. Utilizing Cadmium Red, Yellow Ochre, Burnt Sienna, Burnt Umber, and Ultramarine Blue, along with Titanium White, opens the door to countless possibilities.
Unlocking Your Creative Potential
While this guide provides a fundamental framework, remember that creativity knows no bounds. Experiment with blending, layering, and incorporating additional colors to breathe life into your skin tones. Discover the power of cool reds, embrace blue and green undertones, and watch as your subjects come to life on canvas.
Embark on Your Painting Journey
Now equipped with the knowledge to mix and paint convincing skin tones, it's time to unleash your creativity. Explore the subtle art of capturing the human essence through color and value. Let's dive in and transform your artistic vision into captivating reality.
Mastering Skin Tones: Tips for Success
1. Patience and Practice: Achieving realistic skin tones takes practice. Don't be discouraged by initial results. Embrace each painting as a learning opportunity to refine your technique.
2. Observation is Key: Observe real-life subjects and photographs closely. Pay attention to the subtle variations in colors and values that make up different skin tones.
3. Experiment with Color: While our guide provides a foundational palette, don't hesitate to experiment with other colors. Incorporating unexpected shades can yield unique and striking results.
4. Layering and Blending: Layering and blending colors gradually create depth and dimension in skin tones. Don't rush this process; take your time to build up the richness of the hues.
5. Study Lighting: Understanding how light interacts with skin is crucial. Different lighting conditions can drastically alter the appearance of skin tones. Experiment with lighting angles in your paintings.
6. Embrace Reference Materials: Reference materials such as color charts, photographs, and swatches can serve as valuable guides throughout your painting process.
7. Explore Undertones: Undertones play a significant role in capturing the complexity of skin. Experiment with adding hints of unexpected colors to achieve a more natural and vibrant look.
8. Blend Realism and Expression: While accuracy is important, don't forget the artistic freedom to infuse your work with emotion and expression. Find the balance between realism and your unique style.
9. Be Open to Adaptation: Each subject is different, and some may require deviations from the standard palette. Stay open to adapting your approach to suit the individual you're portraying.
10. Enjoy the Process: Painting skin tones is both a technical and artistic endeavor. Enjoy the journey, celebrate your successes, and learn from every experience.